A little behind-the-scenes for you today!
I wanted to share a before-and-after of this stunning bride I recently worked with, as I don’t often get into the technical side of photography with you. In the next photo, you’ll see the unedited, straight-out-of-the-camera raw file. Every camera’s images are different, and my Canon R6 files are fairly green-yellow in hue and lack the warmth/contrast that I want my photos to be known for.
(We also took these portraits at noon on a bluebird day, so we had extra green/yellow tones from the trees as a result.)
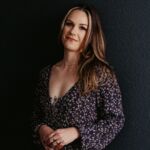
.jpg) Now, you’ll see the end result of what I ultimately delivered to my clients:
Now, you’ll see the end result of what I ultimately delivered to my clients:
.jpg) So how did I get from point A to point B? Here’s a breakdown of my editing process:
So how did I get from point A to point B? Here’s a breakdown of my editing process:
Step 1: In Lightroom, I applied the Portra 160 II preset from Really Nice Images that I’ve adjusted to fit my warmer style. Certain film-based presets can de-saturate skin tones a bit, so I make sure my base preset brings back that bronzy glow. After this, I adjusted the exposure and highlights to bring more attention to the bride’s face and calm some of the bright white spots of the original file.
(I’d like to add — there’s a stigma that if you’re using presets that you aren’t a true artist. Hogwash! Using presets, whether you created them yourself or purchased elsewhere, is a smart business move that helps streamline your editing process. I’m all for it!)
Step 2: I tweaked the hue/saturation sliders to bring the colors to life. The bride had gorgeous, vibrant hair that was a bit overshadowed in the raw file, so I bumped up the luminance of the purples/magentas in the photo, which in turn helped the flowers stand out a bit more. Lastly, I adjusted the hue of the grass and leaves to feel less yellow-y and more forest green (and more true-to-life).
Step 3: After adjusting the color, I went back in with a brush to take away the yellow-ish hues on the bride’s skin, while adding some warmth back in.
Step 4: I finished in Photoshop by removing a blob of dead grass just behind the bride.
…and voilà! That’s the ballgame! Thoughts?! I hope you enjoyed some insight into my editing process. Can’t wait to share more from this intimate wedding!
.jpg)